

 Español
 Català
 Deutsch
 Français
 Português
 Italiano
 Nederlands
 Polski
Where the button is and who can press it
The Run Auto-bind Pipeline button is on the Accounts screen of Amazon Connector for Odoo. In Odoo 17, 18, 19 and 20 it always shows.
You reach it through the menu Amazon › Configuration › Accounts. Each step of the menu asks for a permission, and without it you do not see that step: Amazon asks for Viewer, while Configuration and Accounts ask for Manager.
Seeing the button does not mean anyone can run it: the module checks permissions when you press it, as explained below.
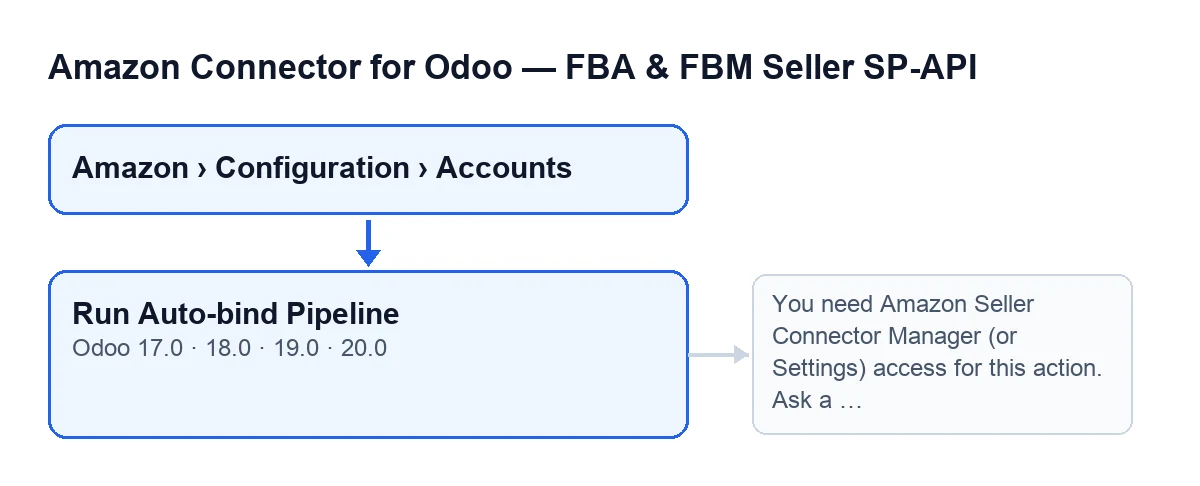
Step by step: from the automatic route to the button
If, on the account form, tab Catalog & Listings, group Auto-bind & Import, Enable nightly auto-bind cron is ticked and the account is active, you do not need to press anything: the nightly task does the same as the button. The button is there for when you want to run it by hand.
- Let the scheduled task do it. The
Amazon SP-API - Nightly auto-bindtask runs once a day and is active as soon as the module is installed. It goes through the active accounts that haveEnable nightly auto-bind cronticked (account form, tabCatalog & Listings, groupAuto-bind & Import) and runs the same process for each one, recordingNightly CRONas the source. On that route, errors in each phase are noted in the summary and the process carries on; if an account fails altogether, that is recorded in its result and the task moves on to the next one. That run also does not post the summary as a message on the account. - Open
Amazon › Configuration › Accounts. You needManagerto see theConfigurationandAccountssteps. - Press
Run Auto-bind Pipelineon theAccountsscreen when you want to run it by hand instead of waiting for the nightly task. Unlike the task, the button does not swallow errors: they are raised again and the process stops. The source recorded isManual. - The module checks your permissions. Unless you are the superuser, you must belong to the connector's
Managergroup or to the Settings group. It then checks that you can write to the account: the groups alone are not enough. - It reads the mode set on the account. The process can work from Odoo, from Amazon or from both sides. If the mode is empty or is none of those, it works from both.
- If the mode includes Odoo, it runs the auto-bind from Odoo. It adds that phase's lines to the summary and collects the bindings it created.
- If the mode includes Amazon, it runs the auto-bind from Amazon. It adds that phase's lines to the summary and collects the bindings created and the ones updated.
- It passes what it collected to a post-process. Only bindings created or updated in this run go in. The summary adds what comes back: catalogue reading and offer sync, with their outcome.
- It saves the result on the account. With the button, it records the date and the text of the last manual run; the text is cut at 5000 characters. It then posts the summary as a message on the account.
- Read that message. It is where you see what happened in the run you have just started.
What the summary contains
The summary is text the module builds line by line. With Odoo in English, these are its lines:
Auto-bind pipeline finished.Account: …, with the account name.Source: …, withManualif you start it with the button andNightly CRONif the task does.Mode: …, with the mode that was used.- Whatever lines each phase adds, from Odoo and from Amazon.
Post-process:, followed byRead catalog OK: …,Read catalog with error: …,Offer sync OK: …andOffer sync with error: ….
If a phase fails, the summary gets Error in auto-bind from Odoo: … or Error in auto-bind from Amazon: …, with the error detail where the dots are. With the nightly task, the process carries on and the summary is saved with that line. With the button, the error is raised again: you see the error, the process stops and the summary of that run is neither saved nor posted. If the mode was both and the Odoo phase fails, the Amazon phase never runs.
Permissions error when pressing it
The message the module foresees when you press the button is the permissions one:
You need Amazon Seller Connector Manager (or Settings) access for this action. Ask a manager to grant Manager access.
It appears when you press the button, before any phase starts, if you are not the superuser and belong neither to the connector's Manager group nor to the Settings group. What to do: ask a manager to give you Manager access, as the message itself says. A Viewer profile can only read, so it is not enough to run this button.
If you do have the group but still cannot run the action, remember that the module also checks write permission on the account, on top of the groups.
If the button starts and stops with an error during one of the phases, the error text comes from that phase and is what you will see on screen.
What it is called in each language
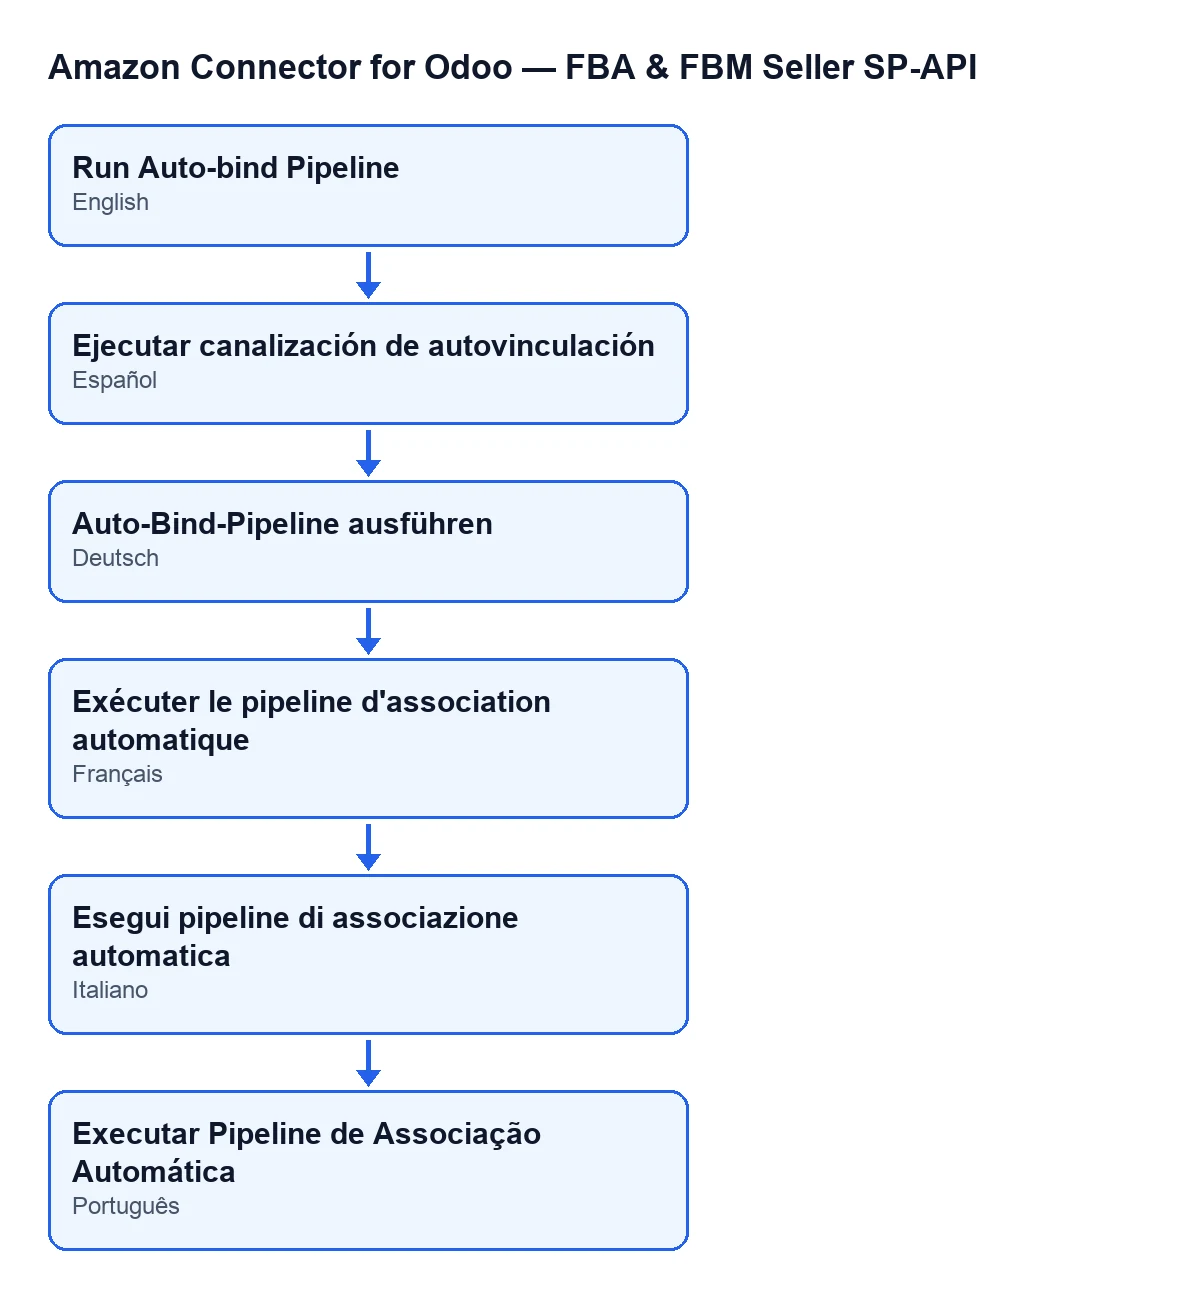
The button's name changes with the language of your Odoo. With Odoo in English it is Run Auto-bind Pipeline. If your Odoo is in another language and you are looking for the button, this image shows what it is called in the published translations.
How FlexigoTech helps
The module is a one-off payment per Odoo version (published for 17, 18, 19 and 20) and needs the FlexigoTech Cloud subscription, Connector plan: €49 a month or €490 a year, excluding VAT, with up to 3 accounts of the platform. The connection goes through FlexigoTech Cloud, which stores the credentials encrypted, monitors the sync and emails you if it fails. Without a subscription, or with the service suspended, what the subscription provides stops; your data stays in your Odoo. There is more detail on the Odoo Apps listing and on the module page.
FlexigoTech implements Odoo 17, 18, 19 and 20 and builds custom connectors and integrations.
Keep reading
Checked in the connector's source code (version 20.0) and the linked sources
Sources
- Module source code: flexigobe_amazon_seller_connector 20.0 (8576afa5): views/amazon_spapi_account_views.xml
- Module source code: flexigobe_amazon_seller_connector 20.0 (8576afa5): models/amazon_spapi_account.py
- apps.odoo.com/apps/modules/20.0/flexigobe_amazon_seller_connector
- flexigotech.com/precios.html
- flexigotech.com/en/services.html